Here’s a quick photo fact: it is technically easier to shoot compelling underwater photos in the bright sunlight and clear water of the tropics. Compared to the tropics, shooting in California means shooting in generally dark water that has less visibility and more suspended particulate matter. But just because California water is less forgiving is not to say creating pleasing images can’t be done. Any underwater photographer who pays close attention to their shooting scenario and technique can enjoy success in our waters. That’s another fact.
For those who are up to the challenges associated with local underwater photography, I will share the techniques and thought processes that helped me create the four shooting scenarios featured in this piece, with the hope that my experience will help you create better images when you shoot in similar situations.
Minimizing Backscatter
A lot of excellent articles have been written about strobe positioning in the effort to minimize backscatter. And it will certainly be helpful to learn those techniques and keep them in the forefront of your mind, especially when working in more challenging water conditions. However, in this article I am going to focus on the technique of composing images in a way that will help you minimize the ruinous impact that blobs of backscatter and suspended particulate matter often creates.
At this point it is important to distinguish between suspended particulate matter and backscatter. Particulate matter consists of naturally occurring particles in the water column as well as those that we add when we stir up bottom sediment. Backscatter is the usually out-of-focus suspended particles that often lead to disappointment when we illuminate, and thus draw attention to, those particles with light emitted by our strobes. These particles are usually located in the area between our lens and subject in the foreground of our photographs. They are out-of-focus because they are too close to the lens to be in focus.
Both backscatter and suspended particulate can be detrimental to our photographs. Unfortunately, we cannot make the particles disappear, but we can minimize the negative impact they often create.
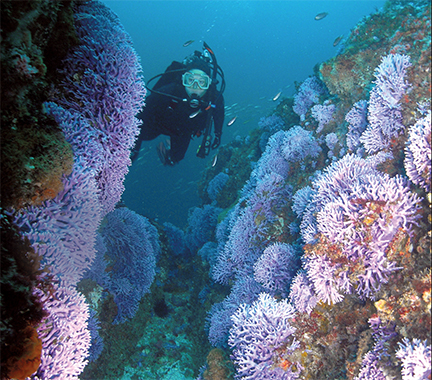
As a general rule, suspended particles are lightly hued. As a result they tend to stand out when framed against black or even the darker greenish and bluish water that we so often experience in California. Combine our water conditions with the often-touted photographic technique of getting low and shooting up at our subjects, and we often end up with a lot of distracting particulate and backscatter ruining our photographs.
To avoid having a lot of “junk” show up in your photos, avoid having darkly hued water in the background of your shot. This can mean shooting at a downward angle, something that is too quickly passed off as a photographic sin. Sometimes it’s okay to violate the “get low and shoot up” rule.
So when limited visibility or dark water presents a challenge, try framing your subject against a more lightly hued reef or sand bottom. The naturally occurring suspended particles along with any backscatter you might have created will still be there, but they will often disappear into the other elements in the background instead of standing out as a distraction.
One often overlooked way to turn what would otherwise be an ordinary snapshot into a compelling photograph involves paying as much attention to the other elements in your frame as you do to the subject. In photographic jargon those other elements are collectively referred to as negative space. The photographic mantra is “negative space should make a positive impression.” In actual fact, good use of negative space can make the difference between an ordinary shot and a compelling photograph.
The takeaway message is to look for complementary negative space when composing your photographs. It’s true that you can’t always find great negative space, or take advantage of negative space due to an uncooperative subject. But you can keep the idea of complementary negative space in the forefront of your thinking when you are looking for subjects and composing shots, and in the right situation that thinking can pay huge dividends.
While we all know that we have some things working against us in California water, it is equally true that one of the things we have that can work in our favor is that many of our reefs are alive with a variety of colorful invertebrates. Their presence and vivid colors can provide wonderful negative space.
I am not saying that negative space needs to be overly colorful, or even add a splash of color for that matter, although well-used negative space often does. The fact is, black water can make great negative space when it complements a subject by making the subject stand out in the shot. In essence, strong negative space is anything that complements your subject and that does not clash or compete with your subject.
Go Big
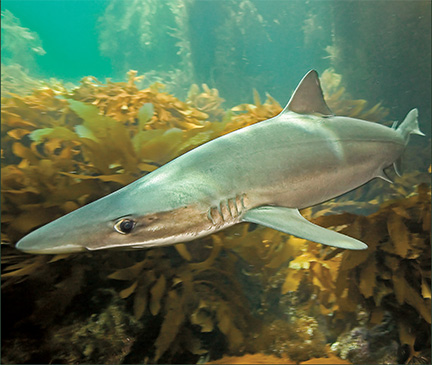
For a lot of underwater photographers the opportunity to photograph relatively large animals immediately gets our undivided attention. The good news is that we have a number of relatively large marine animals that are commonly encountered in many popular dive sites along the mainland and at the Channel Islands. A partial list of the creatures that are large enough to jump start our adrenal glands includes California sea lions, harbor seals, bat rays, soupfin sharks, sevengill sharks and giant sea bass.
One thing you usually want to do when photographing any subject is get close enough for your strobe to give you light for exposure and to “paint” colors that would otherwise be lost as light travels through the water column back into foregrounds and foreground subjects. But even when you get close enough to Mr. Big for your strobes to have the desired impact, those subjects can fail to standout as desired in your shot when your subject is in front of a dark element, or elements, in the background. In many instances this shortcoming in composition is due to getting so excited about the chance to photograph a relatively large creature that we get fixated on our subject and fail to see and consider the background.
In many scenarios you will create a much more pleasing photograph if you compose a frame with a big creature positioned against properly exposed blue or green water instead of a dark background. Getting low and shooting at a slightly upward angle can be a big help in finding that water that you want to expose so that it appears in your final image exactly as it looked to your eyes underwater. This is especially true when there is not an abundance of suspended particulate mater in the water column. But no matter what your shooting angle, working to find a background so that your subject is framed against properly exposed water instead of a relatively dark background is almost always extremely beneficial.
When working at or near the surface it is also very helpful to work with the sun at your back when photographing relatively large animals unless you are attempting to create a silhouette. When facing the sun the water around the “sun ball” and near the surface often takes on an unattractive greenish or whitish color. In addition, it is often impossible to record details in your subject because your subject appears very dark if you properly expose the unattractive water. Conversely, putting the sun at your back often allows you to shoot into water that looks very inviting.
Topside Opportunities
As California divers we enjoy a variety of topside photographic opportunities on our way to and from our dive sites. Not only are those images fun to create, but also they can be the icing on the cake when we present our work.
The following techniques can be helpful when photographing sea lions, harbor seals, whales, dolphins and other subjects that are at or near the surface. Photographing these subjects from a topside vantage point usually requires a telephoto lens. Assuming that to be the case, you will almost always want to use as fast of a shutter speed as you can. A fast shutter speed will help you “freeze” action so you have a better chance to see crisply defined details in the body of a breaching whale, leaping dolphin, or other moving subject.
A fast shutter speed will also help reduce blur that might be caused by the movement of a boat even on a day when the water is very flat. In the case of the photograph of the dolphin I use a shutter speed of 1/500th of a second with the camera’s ISO set to 200. This image is several years old. With a newer-model camera I would boost the ISO to as high of a number as the camera would allow before noise becomes objectionable. In turn, the high ISO setting would allow me to shoot at an even faster shutter speed.
Often when trying to photograph animals that are at the surface from the deck of boat we end up with a severely titled horizon in our picture. Although a slight tilt can be tolerated, an image with a severely tilted horizon usually ends up in the cyber trashcan. Keeping this thought in mind, especially on rougher days at sea when a boat is bouncing as it moves, you can often get pleasing results by keeping the horizon out of your frame.
As every California diver knows, our water provides us with wonderful photographic opportunities. I hope these tips help you in your photographic efforts the next time you explore California waters. And as you do, remember to enjoy the process of creating your images, not just your processed images.