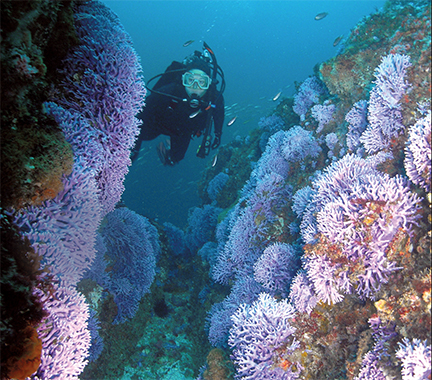
Involving divers in your underwater photography is a big plus. By putting a diver in your photo, the viewer of the photo is able to vicariously put themselves in the underwater scene. The connection is direct and powerful.
But putting divers in your underwater photos carries a multitude of challenges. First you have to have a cooperative model. That model has to understand at least the basics of taking direction and posing underwater. Lighting angles are critical to properly illuminate the face and eyes.
Even with all these things in place, many underwater photographers miss the mark on two critical points in photographing divers underwater— exposure and skin tones.
EXPOSURE
The most important thing to remember about exposing the diver’s skin is that they are as individual as each diver. You have deep, dark African-American to the palest Anglo and everything in between. More often than not, however, in California waters, underwater photographers will overexpose the face. The reason is simple. In an effort to expose the background (often dark in California waters) and make the hooded head appear more natural (usually black or blue in color), the face is overexposed, especially with Caucasians and Asians. You end up with a bright face floating in a dark void. The solution: treat your diver’s face as you would any other subject material. Give your bright subjects less strobe lighting, your darker subjects more.
Two strobes are a must, especially when your photo has two subjects; one being the diver, the other, a fish, or reef formation, or other marine life. With wide-angle work, one strobe can be large and the other a smaller, low-powered, narrow-beam light for exposing the diver. With this you can devote one strobe to each subject, exposing it properly with just the right flash fill. Be careful of strobe overlap. You will want some for more smooth lighting, but too much could lead to overexposure. Also, use a defuser on your strobe for soft, more pleasing light on the face.
Getting the diver’s eyes to appear in a photo can sometimes be a problem. If the diver’s mask and face are at a sharp angle to the camera and strobe, the eyes will either be shrouded in darkness or the glass on the mask will reflect in a mirror-like fashion. There is a simple solution to this problem. If your model can see the strobe firing, their eyes will be illuminated. But if the diver is looking directly into the camera and the strobe is at or close to head on, the flash will bounce directly off the mask’s glass, ruining the picture. To avoid this problem, just direct your model to always angle their face slightly to one side. Proper strobe angling, usually from high and to the side, will also help.
COLOR TEMPERATURE
Proper exposure will mean nothing if your diver’s face has a sickly blue cast and that, unfortunately, happens all too often. Water acts as a powerful light filter. Only a few feet reduces reds and yellows, crucial colors for proper skin tones.
There are a number of different ways to reduce or solve this problem. First, you must use adequate supplemental lighting, usually in the form of strobes. Ambient light photography of people underwater should be limited to very shallow waters or silhouette. Most strobes will emulate ordinary sunlight or “natural” light as much as possible. Some strobes, however, are slightly “warmer.” One of many technical specifications of a strobe is its “color temperature.” If you will be doing a good amount of diver photography, a warmer strobe will give you a bit of an edge.
Second, get as close to your subject as possible. The less water between your strobe and subject, the less the filtering effect. Too much water between the diver’s face and the strobe is the single largest contributor to the “blue face” effect. Keep your distance from strobe to subject within eight feet, preferably less than five. And the best way to do this is with an excellent wide angle lenses—20mm or less. With the wide angle, you will be able to get very close, yet still capture most if not all of the scene. But be warned: as you get close, be careful to not overexpose your diver’s faces!
Although it should not be your primary consideration, your choice of film (if you are shooting film) can have an effect on the appearance of skin tones in your underwater photos. Kodachrome®, Fuji Velvia®, Kodak Ektachrome® VS and an other “color saturated” films have a somewhat warmer color temperature and can help in your diver photos.
And finally, you could use filters, something I do not recommend. Filters overcompensate and are not selective in what they correct, covering the entire scene of the photo. Blue water can turn purple and marine plants and animals lose their natural colors.
DIGITAL COMPENSATION
Digital photography and digital manipulation have opened a whole new avenue of solving the problem bluish skin tones. Don’t try warming up the photo from inside the camera by adjusting the white balance. Leave that on auto. Manipulating it manually will have the same effect as using a warming filter, casting odd colors on other elements of the photo such as the water and reef.
Where you can let the digital age help you is in Adobe Photoshop® or similar photo manipulation program. Convert the image to CYMK (Cyan, Yellow, Magenta, blacK). Use the lasso tool with a 1 pixel feather and select all flesh-tone areas. Go to your color curves pallet and adjust so that in the average sampling of the area to be adjusted so Cyan is no more than 1/3 of Magenta and Yellow. The Yellow setting should be slightly lower than the Magenta. Do not overcompensate. It is better to leave the area a bit too cool (Cyan) than to make it too warm (Magenta and Yellow) as this will make the photo appear cartoonish and fake. You will need to custom manipulate settings according to the diver’s race and individual skin tone. Play with the settings and observe the results. This technique works equally well on scanned and digital original photos.