Adding divers to your photographs adds a special element to your underwater images. The viewer of the photo is able to vicariously put themselves into the underwater scene and thus gain more pleasure out of viewing your underwater pictures. The underwater model can help evoke excitement, awe, and add perspective to the scene.
But there are also a lot of pitfalls to adding a diver to your photos. Cooperation is a must or divers can be more disruptive than helpful.
BEFORE THE DIVE
Communication is the key. Before the dive, discuss important points of what you’d like to accomplish photographically during the dive. Before your usual pre-dive buddy checks, discuss hand signals for posing, eye contact, positioning, etc. Secure loose straps as these can be quite a distraction in the photo once underwater. Make sure gauge consoles, octopus regulators, and BCD hoses are all secure. And once on the bottom, do the check again and secure any loose items.
BUBBLES
Perhaps the biggest destructive element in underwater photos of a diver is bubbles, yet this is one of the most easily prevented. Of course, you do not want to have your model hold their breath but they can breath rhythmically. With slow, steady breathing you can time your shutter click during inhalation when the least amount of bubbles are present.
SILTING AND BACKSCATTER
Even the most graceful divers have their clumsy moments underwater. Silt and fine particulate seem to be everywhere. All it takes is a errant flick of the fin and you will have backscatter problems.
Your model should be proficient at buoyancy control. Fin kicks near the bottom, reef or kelp should be avoided. A surprising amount of particulate can settle on kelp fronts where there is little or no current. And, of course, your model should be especially cautious when settling to the bottom.
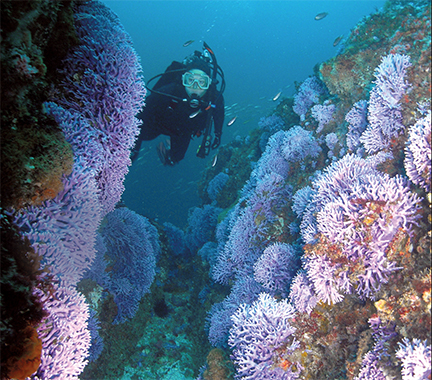
POSING AND EYE CONTACT
Posing is actually not as critical or as difficult as you might think. As divers we should be moving through the water in as much as a streamlined posture as possible anyway. For photos, this is much the same. Elongate the body and avoid a “butt-up” posture.
Perhaps the most important thing your model can do is proper eye contact. The eye contact, however, should not be a straight on stare into the camera. This is usually boring. Eye contact should be with marine life or surrounding underwater scene. Having the diver’s eyes be visible is best but not absolutely necessary. Sometimes simply implied eye contact is just as powerful. But if you want to see the eyes, simply direct your model to turn their head enough so that they can see your strobe go off. If they can see your strobe, you will see their eyes in the photo.
BLUE FACES
As we all know water absorbs warm colored light very quickly. If your model is more than six to eight feet away, their skin will begin to take on a blue cast in the photo. Have them get close for the most natural skin tones.
SILHOUETTES
If getting the diver close is not possible, go for the silhouette shot by getting low and shooting up. As much as possible, get the sun or sunlight behind the diver and expose and focus for your foreground trying to match the exposure to your background. Bracket your shots until you can achieve the desired effect.
ADVANCED
If you and your underwater model get comfortable working with each other and they want to continue into making more dramatic images, consider more advanced aspects of the underwater modeling relationship. First, perhaps your underwater model should carefully match gear by color and choose gear more carefully. Some masks are more flattering on some faces than others. Long sweeping fins can be more pleasing. Weight integrated BCDs are also less clunky looking. And finally, if your model is female, consider water-proof make-up. This is especially important in California waters where a thick wetsuit or dry suit can take away most form or figure. Make-up will better distinguish eyes and facial features.