Look on the cover of any dive magazine and what do you see? While you might see the occasional invertebrate of fish photo, most cover shots are of divers having fun underwater. A diver in the photograph gives perspective to the underwater experience and gives a strong message to the viewer, “You can be there too.” This is very important in editorial photography and in winning contests. Getting good diver shots is easy if you think about what kind of photo you want ahead of time, and take the steps to get it.
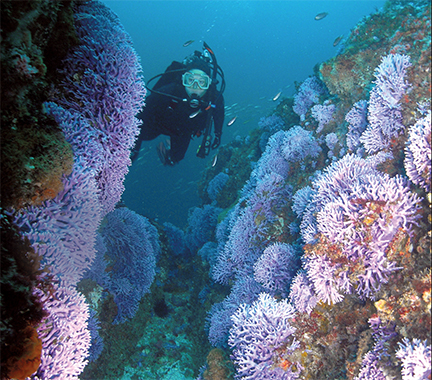
Step 1. Visualize your photo before you head to the beach or boat. Think a bit about what image composition you would like to create. Study photos that you like, of those that have won contests, or have appeared in print. I rarely use a diver as the primary subject; rather, I prefer to use a colorful invertebrate, or fish, or wreck, etc. as the primary subject and use the diver as a secondary subject or “middle ground” of the composition. The diver should look at, and focus attention to, the primary subject, and generally should not look directly into the camera lens.
Step 2. Get the right equipment. To get good diver shots you will need a wide-angle lens. Nikonos users may use a 20mm lens; but, particularly in turbid California waters, a 15mm lens will more often do a better job for you. Housed camera users will want to use at least a 20mm lens, but my favorite for diver portraits is the 18mm lens. I often find the 16mm full frame fisheye lens to be indispensable for getting publishable photos on low vis days. Because you will be getting very close with these wide-angle lenses, you will need two wide-angle strobes to evenly light your subject. Don’t forget about the diver that will appear in your photos, they need to have the right gear for the photo you intend to create.
Step 3. Talk with your model. Communication between photographer and model is very important and hand signals and purpose of the dive should be discussed before you hit the water. I use two fingers on one hand to define the legs of my model and use easy-to-understand hand signals for swimming, kneeling, hovering, etc. Pointing at my eyes and then a direction shows the model where to look; while touching my mask and pointing show how to position their mask. Often. I will position myself where I would like my model to be, and have a signal for “just like that.” Of course the dreaded, “first finger up” means “one more time.” While every team falls into their own pattern of signals it is important to discuss them ahead of time and have a slate to resolve misunderstandings underwater.
Step 4. Put it all together. Choose a dive site that is likely to have the subject/background combination that you visualized in Step 1. Normally it is best to dedicate an entire dive to getting one or two photos rather than mixing objectives. Make sure you and your model agree on your dive plan. Once in the water spend some time finding an optimal subject and don’t settle for the first gorgonia or fish you find. Remember the optimal subject may have everything to do with the subject’s disposition, or relationship to the desired background, than the subject itself.
Once the right subject is found be prepared to optimize lighting angles and composition to get the image you want. Make sure the sun is where you want in the frame and your model can get into a photogenic position. Often, diver and subject are very close together and if the diver looks directly at the subject, their eyes will look cross-eyed. Have the diver look “through” or beyond the subject to get a pleasing eye position. Don’t leave the subject until you are satisfied that you have the image your mind “sees.”
Remember, good models are hard to find and even harder to keep. Unless you can afford super model wages, they will need to feel they are part of the process and are treated fairly.