Own an underwater camera system and dive in California, and before long you’ll find yourself trying to create a great photograph of a fish. After all, with more than 550 species of fishes off the California coast we have a lot of great subjects.
You’re practically guaranteed to have greater success if you develop a strategy for photographing fishes. I’ll share mine in this article and I encourage you to ask other photographers for their input. It’s wise to trade little bits of strategy, philosophy and technique with fellow shooters. Doing so helps us all improve our skills.
Five Easy Pieces
There are many important components to achieving success as an underwater photographer, so it helps to rely upon a set of fundamental practices that you’ll use on every dive. Here are five pieces of advice that will help better your odds of getting good fish portraits, and will likely improve your overall shooting skills.
1) Get neutrally buoyant. Do not overlook or underestimate the importance of good diving techniques. One of the more important techniques in being both a good diver and a good underwater photographer is being able to quickly achieve neutral buoyancy, and then to be able to trim your buoyancy as desired by using the air in your lungs.
2) Note your surroundings. Map out a quick mental path of the approach you will take to get into the desired shooting position. Look for rocks, strands of kelp, sea urchins, or perhaps a structure on a wreck that might impede your progress or improve your photo.
3) Avoid the dreaded “fish butt” photo. When mapping your course, select a shooting position that will allow you to capture the image without frightening the subject. Otherwise, all you’ll get is fish butt — a blurry tail shot as the fish speeds away. Estimate the distance you’ll be shooting from and set the aperture, shutter speed, ISO and strobe power accordingly. By setting these controls before you get on top of the subject, you minimize movements that might cause a fish to turn away, retreat into a hiding place or swim away.
4) Have a goal in mind. Whenever possible, I try to determine the type of shot I am going to try to capture so that once I am in shooting position I’ll be ready to compose and shoot. Sometimes fish can be great posers. But other times our window of opportunity is short. I want to be ready to start composing and shooting as soon as possible after I get into position. I divide my fish photographs into five major categories, which I’ll cover in this article.
5) Consider your composition. Horizontal? Or Vertical? Too many underwater photographers shoot almost all horizontal frames. That is probably because it is easier to hold most camera systems and position strobes with the camera in a horizontal orientation. But this is not to say that a frame composed with a horizontal orientation is any more or less likely to create a more pleasing composition than a vertical frame.
To shoot a vertical frame after composing a horizontal frame a photographer needs to re-position a strobe, or strobes, and that can be a hassle. But it is a hassle that is worth the effort because the end result can be more pleasing composition. Once I have made the decision regarding my shooting orientation I move my strobe(s) into the desired position(s) so I can minimize my movements when I am close to the fish I want to photograph.
Five Categories Of Fish Photographs
I categorize my fish photographs as follows; (1) identification shot, (2) fish in an animated pose, (3) fish in its natural environment, (4) behavioral shot, and (5) dramatic shot. The idea behind my system is to help me get started when I see a potential subject. I can always modify my plan, but all too often those perfect moments are fleeting. I want to be shooting, not fumbling around with my thoughts or my camera system when an opportunity presents itself.
1) The Identification Shot. As the name suggests identification (ID) shots are used to make it easy for a viewer to identify a given fish. For an ID shot, try to include the entire fish in the frame with the fish parallel to the sensor. Avoid including distracting background elements whenever possible. Identification shots aren’t always the most esthetically pleasing type of shot, but they serve an important purpose.
2) Fish In An Animated Pose. The main concept behind shots in this category is to compose a visually appealing image, so try approaching the subject from an angle of 15 to 45 degrees from head-on.
When possible shoot at a slightly upward angle to add dramatic appeal, but with fish, especially those that live on the sea floor, this isn’t always possible.
In an animated pose the fish is facing the camera with its tail toward the background of the shot. Be very careful to make sure that the fish’s eye, or eyes, and other facial features are in sharp focus. Depending on the size of the subject and the shooting distance you might be able to use a small enough aperture (toward the f/22 end of the scale) to have the entire fish within the depth-of-field. If this isn’t possible, try to have the out-of-focus parts of the fish be toward the animal’s tail, not the face.
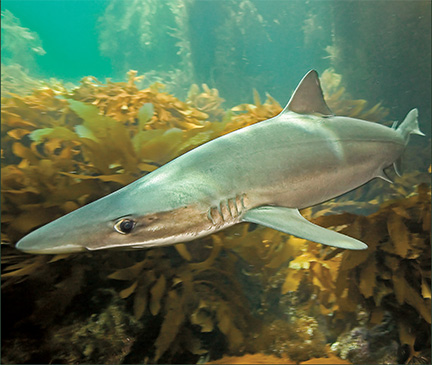
3) Fish In Its Natural Environment. The goal here is to show the fish in the context of its natural environment so that viewers immediately realize that the image was created in the wild as opposed to an aquarium. To do this I include some identifiable aspect of the environment such as a section of reef, water, a structure on a shipwreck or a blade of kelp in the frame.
4) Behavioral Shot. Obviously, in a behavioral shot the goal is to reveal a behavior such as courtship, mating, egg laying, predation, cleaning, camouflage or parasitism etc. Images that reveal behavior often have a big “wow!” factor and make a strong impression on audiences.
When a behavioral opportunity presents itself the key is to recognize the behavior quickly and determine how close you think you can get to the action without disrupting it. Then, establish your camera settings, check your approach path and go for it without getting in such a big hurry that you frighten your subject or use poor technique.
Some behaviors such as predation occur in the blink of an eye and the ability to act quickly is paramount. In other instances the behavior occurs over the period of several minutes. The more you know about your subject, the better you will be at judging the amount of time you have to get your shots.
5) Dramatic Shot. The photographs I categorize as dramatic shots are usually a close-up of a body part such as the face, fin, eye, or tail etc. While there are exceptions, I usually try to create this type of shot after getting images that fit into other categories because I have to get so close to my subject to capture a dramatic shot that I run the risk of causing my subject to flee.
Making Adjustments
Whenever possible try bracketing your exposure — increasing and decreasing your exposure by at least one full f/stop on either side of your original exposure. As a rule, I make exposure adjustments by changing my aperture, but there are instances in which I adjust my ISO, strobe power or shutter speed.
After you’ve bracketed your exposures, take a moment to review a few images to make sure you are getting good results. Just be careful not to push the camera system toward the subject. Instead, back away from the camera to view the LCD screen.
When reviewing a shot, or series of shots, I check to see exactly where the lens was focused (an available feature in many higher end SLR cameras by making a selection in the playback menu). I also evaluate both my luminance and RGB histograms to check on my exposure. As far as I am concerned the ability to check histograms is one of the bigger advantages offered by digital cameras.
Even if I think I nailed my shot, if gas and bottom time considerations allow I usually bang off a few more shots of my subject, just for good luck. In too many instances I have ended up disappointed with my results because while I was still underwater I did not see a ruinous piece of debris that was floating in the water in front of a fish’s eye or other body part and that was something that I could not “fix” with post-capture software.
If you try to capture a nice horizontal and vertical image that qualifies for each category of every fish you encounter this means that you will have a minimum of 10 types of shots to pursue for every species. Considering how many behaviors, natural settings, poses and dramatic shots are possible, I don’t think it is possible for an underwater photographer in California to run out of great subject matter when trying to photograph our fishes.
Of course, you can’t create those perfect fish photographs unless you get out there and dive, and there is no better time than now to plan your next underwater adventure!